Around this time of year, I am ready. for. Spring. How about you? Are you over winter, yet? I'm ready for a break from the clouds and the rain, and for my bones to warm up! Here's an easy tutorial for drawing tulips to put you in the spirit for spring. If you are into cardmaking or art journaling, it's great to have a few easy doodles in your toolbox!

I love drawing and sketching, and love to add flower drawings to my art journals and Bible art journal pages and cards. Sometimes, I just like to draw for no reason.
Even if you think you can't draw, you can draw this tulip. I promise!

To draw a simple tulip, begin by drawing a bowl shape. I angled my bowl, but you can make yours straight, if you want. Draw very lightly, as this is a guideline that will be erased later.

Now, draw an oval on top of the bowl you drew, as shown above.

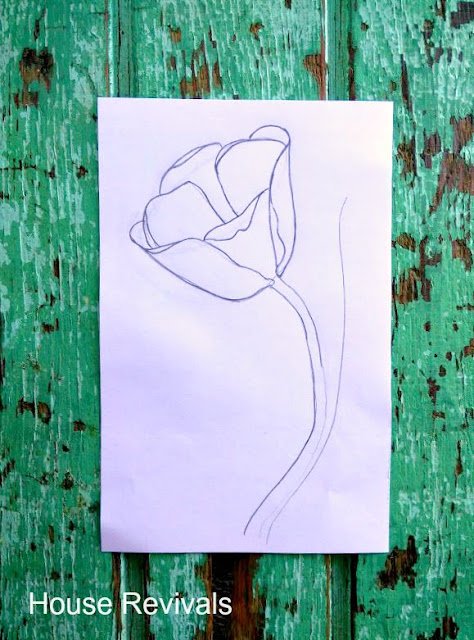
Next, using the guidelines you just drew, draw three petals, just like you see here. If you want your petals to look like they're folded back, add some extra wavy lines, like I did.

Add three more petals, then erase your guidelines.

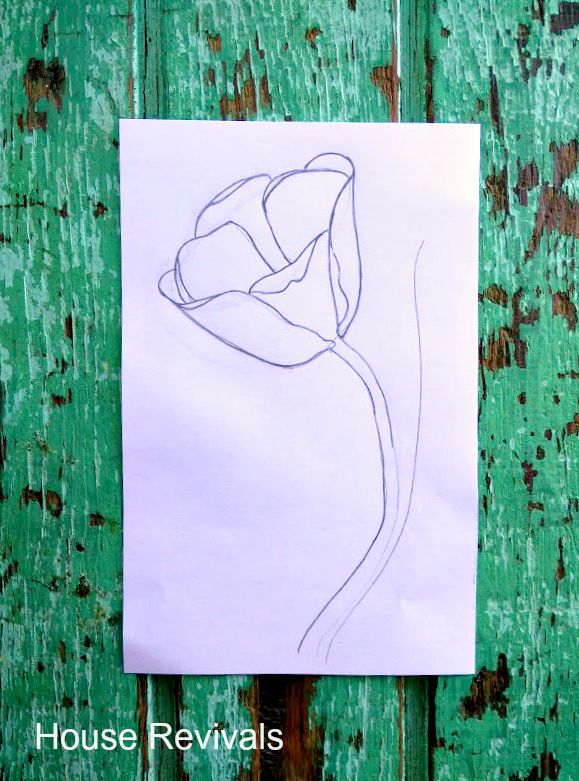
Sketch a stem below your tulip.
For your first leaf, draw a slightly curved line coming from the base of the stem. This will be the center line of your leaf.

Now draw the outside edges of the leaf. Make your lines slightly wavy.

Draw a second leaf in the same way, or get a little creative and draw it in profile, as I have done. Make one side of the leaf look like the edge is curled by giving that edge a wavy line.

Add some stamens in the center of the tulip.

Sketch in some anthers over the stamens. These are basically skinny football shapes. You can indicate a little pistil in the center, if you want, by sketching something that looks like a very tiny three-petaled daisy in the middle of the stamens.

Go back over your sketch, adding detail to the petals. Darken the drawing with pencil or by using a black pen. Add shading as desired.

Add color using colored pencil or markers, if desired.
Bam! It's that easy!

To learn how to draw and paint when you don't have time and don't know how, click here.
If you enjoyed this tutorial, please subscribe to House Revivals in the sidebar, so you won't miss the fun projects we have scheduled. Find us on Facebook, too, so you can catch all the "in between" stuff, and see what I'm working on daily on Instagram. Feel free to link today's post to your favorite social media sites.
Thanks so much for stopping by!


I love drawing and sketching, and love to add flower drawings to my art journals and Bible art journal pages and cards. Sometimes, I just like to draw for no reason.
Even if you think you can't draw, you can draw this tulip. I promise!

To draw a simple tulip, begin by drawing a bowl shape. I angled my bowl, but you can make yours straight, if you want. Draw very lightly, as this is a guideline that will be erased later.

Now, draw an oval on top of the bowl you drew, as shown above.

Next, using the guidelines you just drew, draw three petals, just like you see here. If you want your petals to look like they're folded back, add some extra wavy lines, like I did.

Add three more petals, then erase your guidelines.

Sketch a stem below your tulip.
For your first leaf, draw a slightly curved line coming from the base of the stem. This will be the center line of your leaf.

Now draw the outside edges of the leaf. Make your lines slightly wavy.

Draw a second leaf in the same way, or get a little creative and draw it in profile, as I have done. Make one side of the leaf look like the edge is curled by giving that edge a wavy line.

Add some stamens in the center of the tulip.


Go back over your sketch, adding detail to the petals. Darken the drawing with pencil or by using a black pen. Add shading as desired.

Add color using colored pencil or markers, if desired.
Bam! It's that easy!

To learn how to draw and paint when you don't have time and don't know how, click here.
If you enjoyed this tutorial, please subscribe to House Revivals in the sidebar, so you won't miss the fun projects we have scheduled. Find us on Facebook, too, so you can catch all the "in between" stuff, and see what I'm working on daily on Instagram. Feel free to link today's post to your favorite social media sites.
Thanks so much for stopping by!