Can it possibly be that time again? Has it really been an entire year since we wrapped up 2010? We started out our year behind schedule on our beach house remodel. I spent the holidays dealing with a nightmare contractor who was supposed to have lifted our house nine feet off the ground to better capture the view.


Fortunately, after consulting a construction attorney, and interviewing and getting bids from several other contractors, we fired the old house raiser and found the perfect contractor to take on our project in January. He squeezed us into his schedule.
*My personal favorite post of the year was when our house was finally lifted up onto cribbing.

During the lull between the holidays and when the remodel could resume, I was able to do a little crafting.
*My Jimmy Choo inspired handbag was one of my most popular posts this year! It still gets lots of hits daily, and has inspired another handbag project I'm working on, now.

*Another popular project with my readers was my Mod Podge Union Jack picture with faux tin letters.


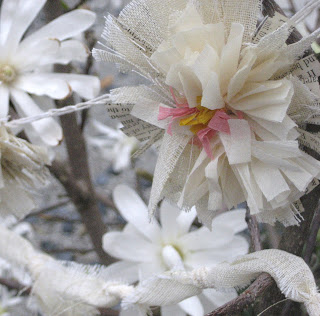
*This nature inspired garland made from vintage crepe paper, vintage book pages, and a few other random elements was a huge hit.

This project was inspired by the Japanese Magnolias that were blooming in our rooftop garden.

*We received some delightful news, which made us re-think our plans for the beach house courtyard.

During the beach house remodel, we found ourselves house hunting. Again. We needed a pied-a-terre in the city. During our search, I was struck by the number of really bad kitchens in the MLS listings.
*I decided to do a couple of virtual budget make-overs to show how, with a little DIY knowledge and elbow grease, a kitchen could be made more beautiful and more functional.


Around mid-year, things started to get a little crazy around here. Our daughter came to stay with us, as her husband was being deployed to Afghanistan. We had to rush the remodel, and make changes in some of our finish choices, to have the guest wing of the beach house completed in time. After my daughter arrived, we had just a few weeks to bring the remodel in the rest of the house to a stopping point. You see, we were expecting another houseguest to arrive, and we did not want the commotion and dust that goes along with having contractors in your house.

*I continued working on little projects around the beach house, but found I wasn't as efficient as I had been in the past. It's just so hard to do DIY when you're snuggling a sweet little grandbaby...
By the time the holidays rolled around, I was ready for some small portable projects to work on.
*We had recently purchased our pied-a-terre, a marina condo, with a boat slip, a parking place, and a storage locker -- but no bathroom fixtures!

It was a bank-owned-flip-gone-wrong, so we got it for a song, and had begun renovations on it.
*I needed to take a little break from projects involving ladders and power tools, so I did a couple of Christmas projects.

*These little mitten ornaments turned out to be really popular on Pinterest!

It was really special, putting together our first Christmas mantel at our beach house. We were surrounded by packing boxes and unfinished projects, but we still managed to pull something together.

* Christmas morning found us all in the beach house living room, with a crackling fire, a lovely Christmas tree, and an amazing view of the Pacific.

Looking back, we didn't accomplish as nearly much as we had expected, but we also accomplished more. Funny how that works....


Fortunately, after consulting a construction attorney, and interviewing and getting bids from several other contractors, we fired the old house raiser and found the perfect contractor to take on our project in January. He squeezed us into his schedule.
*My personal favorite post of the year was when our house was finally lifted up onto cribbing.

During the lull between the holidays and when the remodel could resume, I was able to do a little crafting.
*My Jimmy Choo inspired handbag was one of my most popular posts this year! It still gets lots of hits daily, and has inspired another handbag project I'm working on, now.

*Another popular project with my readers was my Mod Podge Union Jack picture with faux tin letters.


*This nature inspired garland made from vintage crepe paper, vintage book pages, and a few other random elements was a huge hit.

This project was inspired by the Japanese Magnolias that were blooming in our rooftop garden.


*We received some delightful news, which made us re-think our plans for the beach house courtyard.

During the beach house remodel, we found ourselves house hunting. Again. We needed a pied-a-terre in the city. During our search, I was struck by the number of really bad kitchens in the MLS listings.
*I decided to do a couple of virtual budget make-overs to show how, with a little DIY knowledge and elbow grease, a kitchen could be made more beautiful and more functional.


Around mid-year, things started to get a little crazy around here. Our daughter came to stay with us, as her husband was being deployed to Afghanistan. We had to rush the remodel, and make changes in some of our finish choices, to have the guest wing of the beach house completed in time. After my daughter arrived, we had just a few weeks to bring the remodel in the rest of the house to a stopping point. You see, we were expecting another houseguest to arrive, and we did not want the commotion and dust that goes along with having contractors in your house.
*I continued working on little projects around the beach house, but found I wasn't as efficient as I had been in the past. It's just so hard to do DIY when you're snuggling a sweet little grandbaby...
By the time the holidays rolled around, I was ready for some small portable projects to work on.
*We had recently purchased our pied-a-terre, a marina condo, with a boat slip, a parking place, and a storage locker -- but no bathroom fixtures!
It was a bank-owned-flip-gone-wrong, so we got it for a song, and had begun renovations on it.
*I needed to take a little break from projects involving ladders and power tools, so I did a couple of Christmas projects.

*These little mitten ornaments turned out to be really popular on Pinterest!
It was really special, putting together our first Christmas mantel at our beach house. We were surrounded by packing boxes and unfinished projects, but we still managed to pull something together.

* Christmas morning found us all in the beach house living room, with a crackling fire, a lovely Christmas tree, and an amazing view of the Pacific.

Looking back, we didn't accomplish as nearly much as we had expected, but we also accomplished more. Funny how that works....
How about you? Did 2011 turn out the way you expected?